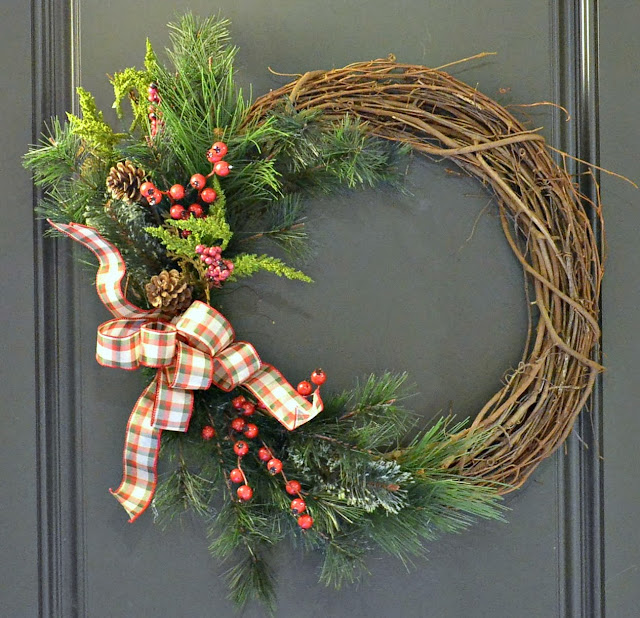
I've been telling my husband on repeat that I am officially a "wreath maker" after completing our second wreath for our door. I am sure it will get old soon, if it isn't already, but I am just so excited to have a new Christmas wreath on our door. I continuously tell people how easy it really is and I truly mean it. After finding this beautiful base to work with, I have found that it is easy to create your own wreath.
What you'll need:
16" or 20" Vine Wreath
Faux Pine Florals and Holiday Florals with red berries and pine cones
TIP: I like to get a couple of different styles to add depth and texture. To make sure it will look good hold the different styles together in your hands to see how well they will blend together
Wired Holiday Ribbon
Hot Glue Gun and Glue
I always recommend going to Hobby Lobby as they have many great deals. Right now all Christmas decor is 50% off, plus they have other deals and coupons here that you can use.
First you will lay in the faux pine and florals into the wreath. This style utilizes one side of the wreath base and will have two sections going in opposite directions. The ends of the pine florals will meet in the middle, as you can see above. Before gluing in the pieces, lay everything out to make sure you have an idea of where each piece will lay. I used slightly more of the red berries on the top half of the wreath since they are heavier pieces and also because the top half is really what you want to show off.
Once you have an idea of where the pieces will go, begin to lay the hot glue down on where you will be pushing in the ends into the vine wreath base. Hold the piece in and then continue to glue in the rest.
Next you will need to create the bow for the middle of the florals. First you make six loops and hot glue the ends together. Make sure you extra length at the bottom as this is the part of the bow that you will together and down onto the wreath. You can see this above in the picture on the right. You will also want to make half of the bows slightly larger than the other since they will be sitting on top of each other.
Take a small and large bow loop and hot glue the bottom of the two loops so that they are sitting on each other. You will want to lay the two loops so that the smaller one is on top of the larger one and so that it leaves room for the larger one to show.
TIP: Always use wire ribbon, it is easy to manipulate and style.
Once all three ribbon pieces are glued in, you will need to glue in the three sets of loops. Each ribbon will get it's own set. You will hot glue the three sets nearby each other in the center of the ribbons. Once the glue is dry, use your fingers to fluff up the loops and bend the ribbon to style it.

